Maneuvers
- Taxi
- Why?
- An airplane isn't meant to drive around, so it doesn't do it very well, so learning to taxi properly is really very important.
- How?
- Get a clearance to taxi (if required), and read it back
- Controlled/ uncontrolled.
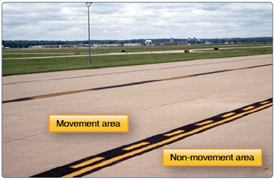
- Movement/ non-movement area
- Do a brake check before getting rolling
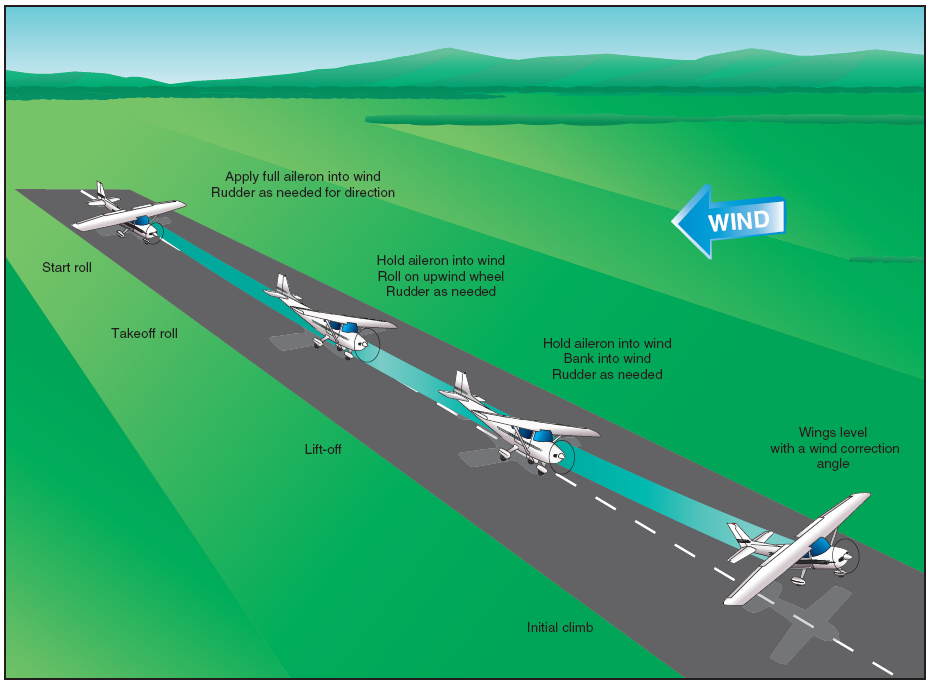
- Position controls for wind: dive away from, turn into wind
- Use rudders for steering: small control movements
- THROTTLE controls speed, not brakes. Use brakes very sparingly. Taxi at walking pace
- Follow the appropriate markings and signs, and go according to clearance
- Common errors:
- Trying to steer with the yoke.
- Yoke not positioned correctly for wind
- Not on the centerline
- Poor speed control: brakes instead of throttle
- Over controlling
- Hand not on throttle
- Disorientation
Takeoff and landings
- Normal takeoff
- Perform all appropriate checklists and briefings
- After cleared for takeoff ( if controlled) Check the approach path is clear and then taxi into takeoff position, line up with the runway and smoothly apply full throttle
- If uncontrolled, make all appropriate radio calls, and be cautious when entering the runway
- Perform mist check
- Mixture
- Instruments
- Seatbelts
- Time/transponder
- Call out “airspeed alive”. When rotation speed is reached, pitch to Vx ( if climbing over an obstacle 55, IAS) or Vy (faster climb in a given time, 67 IAS). and trim as necessary
- Continue climb to desired altitude. Every 200’ pitch the nose down or do S turns to watch for traffic

- Common errors
- Failure to adequately clear the area prior to taxiing into position on the active runway
- Failure to check engine instruments for signs of malfunction after applying takeoff power
- Failure to attain proper lift-off attitude
- Inadequate compensation for torque/P-factor during initial climb resulting in a side-slip
- Over-Control of elevators during initial climb out
- Failure to attain/maintain best rate-of-climb airspeed (Vy)
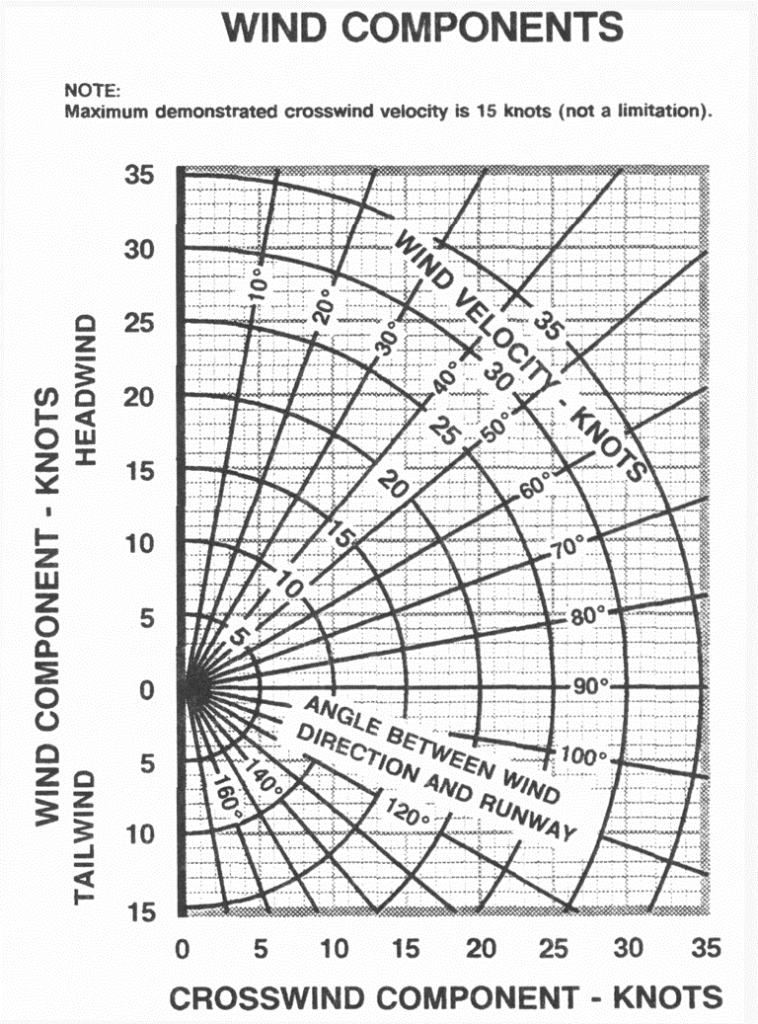
- Crosswind takeoff and climb
- Same procedure as normal takeoff
- Use wind component graph
- Soft field takeoff
- Why?
- Taxing and taking off a soft runway (grass) and you want to “protect “ your nose wheel
- How?
- Taxi
- When you start taxing to the active runway, apply aft pressure on the elevator. this will decrease the pressure on the nose wheel
- Takeoff
- Follow all appropriate checklists
- Once you are cleared to takeoff, you will begin entering the runway while applying back pressure on the elevator
- Once you are lined you will progressively increase the throttle to full while maintaining back pressure on the elevator.
- Also remember to make appropriate call-outs, (instruments, heading,speed)
- As the aircraft speeds up, it will become light on the nose wheel and eventually the nose wheel will pick up
- When it picks up, decrease back pressure on the yoke enough to maintain a controlled attitude
- The aircraft will continue speeding up until lift off - after lift off, pitch forward to become parallel with the runway while maintaining in ground effect
- Once rotation speed is reached, pitch back and climb at Vx or Vy

- Common errors
- Failure to adequately clear the area
- Insufficient back-elevator pressure during initial takeoff roll
- Tail strike
- Failure to cross-check engine instruments for indications of proper operation
- Poor directional control
- Climbing too steeply after lift-off
- Allowing the airplane settle resulting in an inadvertent touchdown
- Attempting to climb out of ground effect area before attaining sufficient climb speed
- Failure to anticipate an increase in pitch attitude as the airplane climbs out of ground effect
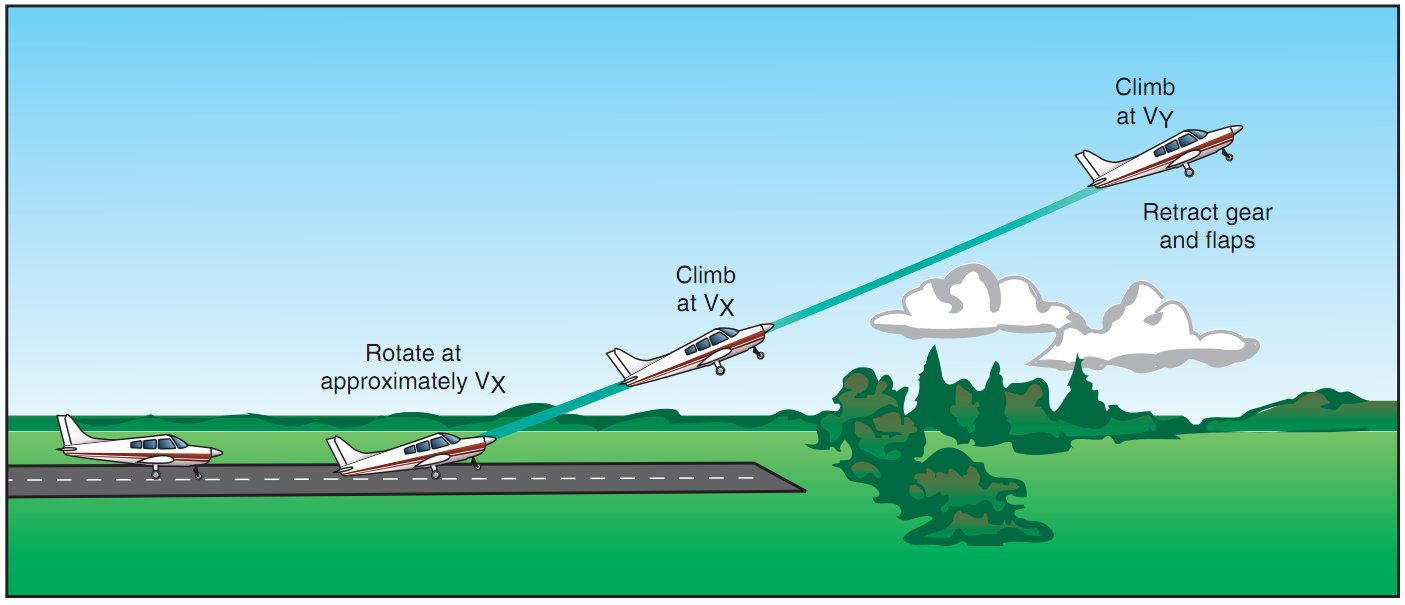
- Short field takeoff
- Why?
- Short runway, obstacles. we want to gain as much altitude we can in the shortest distance
- How?
- Go through the appropriate checklists
- Request to line up with the runway
- Apply full breaks, 10ºflaps, and full throttle
- Upon engine peak, release brakes, maintaining runway centerline with the rudder pedals
- As you start to roll, monitor your airspeed
- call-out: "Airspeed Alive"
- At Vr, call out, "Rotate" and increase control yoke back pressure to pitch up
- Smoothly pitch up or the aircraft may delay a climb
- Forcing the aircraft off the ground may leave it stuck in ground effect or stall
- After liftoff, establish and maintain Vx (55 IAS) until all obstacles are cleared, while maintaining the flight path over the runway centerline
- With obstacles cleared, lower the pitch to begin accelerating to Vy (67 IAS)
- At or above safe flying speed , retract the flaps to 0°
- Establish and maintain Vy
- Trim as necessary
- Common errors
- Failure to adequately clear the area prior to taxiing into position on the active runway
- Insufficient back-elevator pressure during initial takeoff roll
- Failure to cross-check engine instruments for indicators of proper operation
- Poor directional control
- Climbing too steeply after liftoff
- Allowing the airplane to "mush" or settle, resulting in an inadvertent touchdown after liftoff
- Attempting to climb out of ground effect area before attaining sufficient climb speed
- Failure to anticipate an increase in pitch attitude as the airplane climbs out of ground effect
- Normal landing
- Downwind
- Slow the aircraft to 90 KIAS (approximately 2200 RPM)
- When on downwind, do downwind checklist ( if straight-in, also do downwind check)
- Mixture full rich
- Instruments in the green
- Seatbelts on and secure
- Carb. heat on
- Landing light (required for commercial operations at night)
- Fuel shut off valve off
- Request landing (full stop/ touch and go/ stop and go
- Abeam the landing spot, pull throttle to 1500 - 1700 rpm
- When IAS is below the white arc (85 KIAS ) apply flaps to 10°, allow aircraft to settle
- Pitch/trim for a 80 KIAS descent
- Base
- Apply 20° flaps
- Pitch/trim for a 70 KIAS descent
- Final
- Pitch and trim for 60 KIAS +/- 5, flaps to 30° if necessary → Follow glide slope if available
- REMEMBER → pitch for airspeed, power for altitude
- Final checklist
- Positive aircraft control
- Center line
- Stabilized approach
- Focus your eyes on the end of the runway, start your flare when close to the ground
- Peripheral vision helps
- Power to idle and gently give aft pressure on the elevator as necessary to flare, landing on main gears first
- Common errors
- Inadequate wind drift correction on the base leg
- Overshooting or undershooting the turn onto final approach
- Failure to complete the landing checklist in a timely manner
- Unstabilized approach
- Attempting to maintain altitude or reach the runway using elevator alone
- Failure to hold sufficient back-elevator pressure after touchdown
- Excessive braking after touchdown
- Soft field landing
- Why?
- Designed to protect the nose wheel and eliminate risk of rough landing caused by tall grass, soft sand, mud or snow.
- How?
- Follow same steps as in a normal landing
- Add a little power before touchdown
- After touchdown, remove power and keep nose wheel off the ground for as long as possible
- Do not apply breaks
- Maintain back pressure for taxi

- Common errors
- Too fast of a descent rate, causing a hard touchdown
- Too much airspeed, causing excessive float
- Unstabilized approach, making it hard to touch down smoothly
- Allowing the nose wheel to touch down early, causing excessive stress on the nose wheel
- Short field landing
- Why?
- The goal is to maximize aircraft performance in order to safely and accurately land when runway distance is limited
- The approach is made with minimum engine power commensurate with flying towards the aiming point on the runway resulting in a steeper approach
- How?
- Select and declare a touchdown point.
- Landing checklist
- Abeam touchdown point: Power to 15’’-17", below 85 IAS , 1 notch flaps. Pitch for 80. Trim
- Turn base. Second notch flaps. Pitch for 70. Trim.
- Turn final. Third notch flaps. Pitch for 60 and steep approach. Adjust power as necessary. (Hand on throttle)
- Short final, speed 55
- When field is made: power to idle. Flare. (little or no float). Land at stall speed.
- Touchdown with main wheels first within 100′ beyond or on the specified point
- Retract flaps to minimize lift and maximize weight on the wheels
- Apply the brakes and position the elevator control as necessary to stop in the shortest possible distance consistent with safety.
- After-landing checklist.
- Common errors
- Erratic descent rate, airspeed, pitch
- Uncontrolled flare
- Long touchdown/float
Performance maneuvers
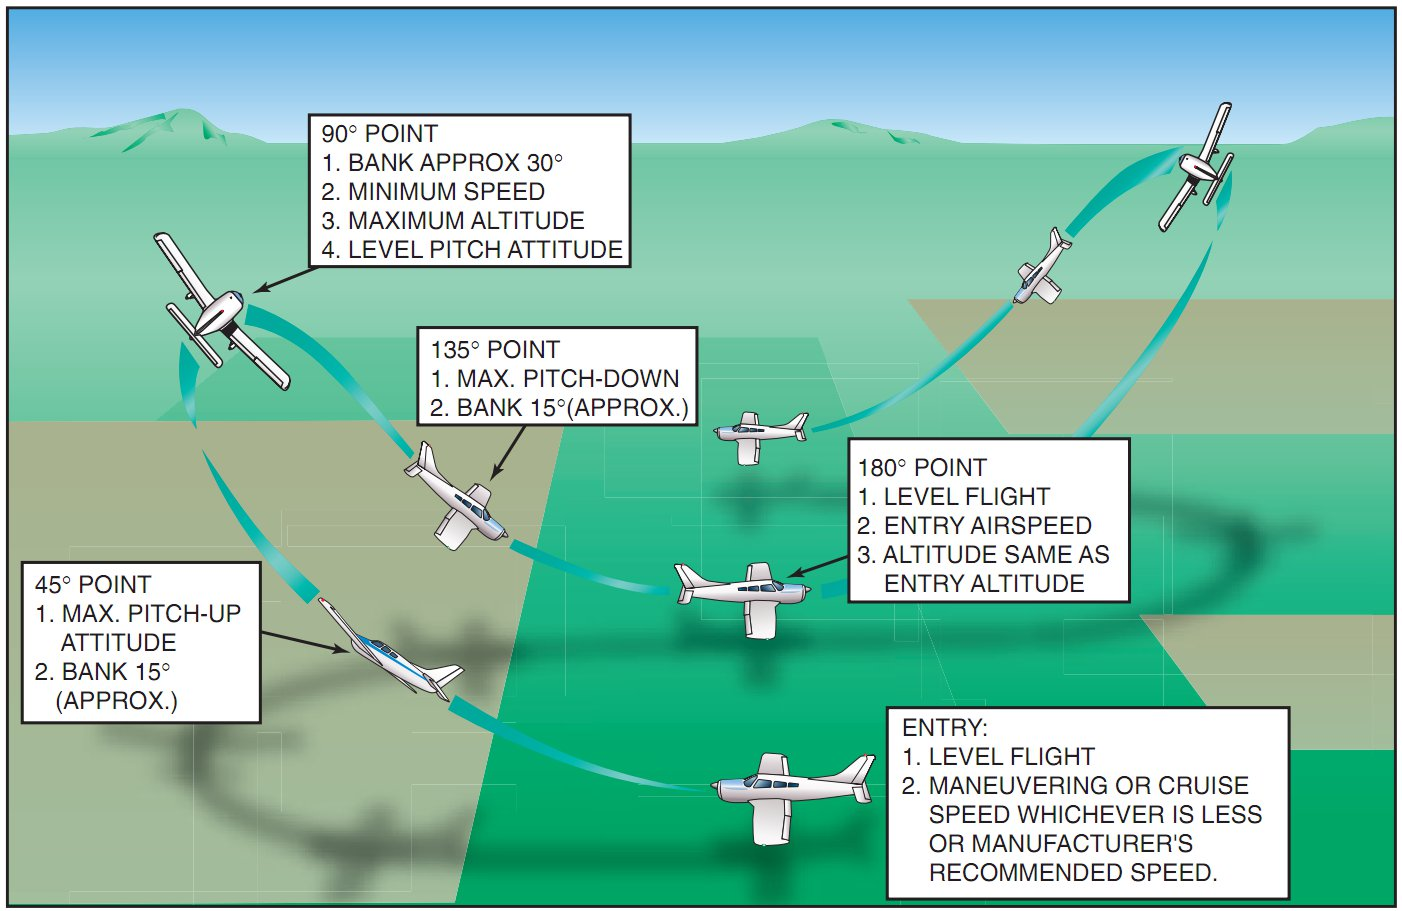
- Chandelle
- What?
- A combat maneuver to make the enemy aircraft stall
- Why?
- Develops the pilot's coordination, orientation, planning and feel for maximum performance flight
- How?
- Clearing turn
- Pre maneuver checklist
- Put wing on reference spot (cross check with Heading indicator )
- First 90º constant bank with changing pitch, second 90º constant pitch with changing bank
- Turn into 30º bank, smoothly add full power, slowly start pitching up
- After first 90º, maintain pitch and slowly start rolling out to arrive at the 180° point with the wings level (reference point off from the opposite wing) and at minimum controllable airspeed
Airplane Flying Handbook, Chandelle
- Common errors
- Failure to adequately clear the area
- Too shallow an initial bank, resulting in a stall
- Too steep an initial bank, resulting in failure to gain maximum performance
- Allowing the pitch attitude to increase as the bank is rolled out during the second 90° of turn
- Removing all of the bank before the 180° point is reached
- Nose low on recovery, resulting in too much airspeed
- Poor coordination (slipping or skidding)
- Failure to scan for other aircraft
- Attempting to perform the maneuver by instrument reference rather than visual reference
- Lazy 8’s
- Why?
- Develops coordination of controls through a wide range of airspeeds and altitudes, so that certain accuracy points are reached with planned attitude and airspeed
- How?
- Clearing turn
- Pre maneuver checklist
- Adjust the pitch and power to maintain altitude and set cruise power
- Pick 45°, 90°, and 135° reference points on or out to the horizon
- Start with your wing on the 90° reference point
- Bank 5º, slowly increase pitch
- 45º thru → half bank and full pitch
- From the 90° reference point, you’ll be at full bank.
- Allow the pitch attitude to continue decreasing and initiate a slow decrease in the bank angle, continuing a descending turn in the direction of the 135° reference.
- From the 135° reference point, you’ll be at half bank and full pitch down.
- Continue decreasing the bank angle while allowing the pitch to increase so that the airplane returns to the entry airspeed and altitude by the 180° reference point
- From the 180° point, immediately commence a climbing turn in the opposite direction, repeating the steps above
- Upon completion of the maneuver, resume normal cruise
- Re-trim as necessary
- Common errors
- Failure to adequately clear the area
- Inadequate planning, resulting in the peaks of the loops both above and below the horizon not coming in the proper place
- Persistent gain or loss of altitude with the completion of each eight
- Slipping and/or skidding
- Failure to scan for other traffic
- Steep turns
- Why?
- Develops smoothness, coordination, orientation, division of attention and control techniques necessary for maximum performance turns
- Bank angles of 45° to 60° are considered "steep"
- How?
- Perform clearing turns
- Select a prominent visual reference point ahead of the airplane and out toward the horizon
- Adjust the pitch and power to maintain altitude
- Maintain heading and note the pitch attitude required for level flight
- Roll into a 45° bank or 50° bank in the direction previously cleared
- Trim nose up
- Remain coordinated
- Rolling through 30° of bank, increase power to maintain airspeed
- Increase pitch to maintain altitude
- Trim as necessary
- Pull back on the yoke will increase rate of turn but do not allow the aircraft to climb
- Reference the visual point selected earlier and roll out 20-25° before entry heading
- Through 30° of bank, decrease RPM
- Decrease pitch
- Trim nose down
- Return to wings level on entry heading, altitude, and airspeed
- Immediately roll into a bank in the opposite direction
- Perform the maneuver once more in the opposite direction
- Upon rolling out after the second turn, resume normal cruise
- Common errors
- Failure to adequately clear the area
- Inadequate back-elevator pressure as power is reduced, resulting in altitude loss
- Excessive back-elevator pressure as power is reduced, resulting in a climb, followed by a rapid reduction in airspeed and "mushing"
- Fixation on the airspeed indicator
- Inadequate power management
- Inability to adequately divide attention between airplane control and orientation
- Steep spirals
- Why?
- Steep Spirals simulate an emergency situation where an aircraft is required to descend as rapidly as possible to a forced landing
- How?
- Select an altitude where recovery will occur no lower than 1,500' AGL
- Determine wind direction and perform clearing turns
- Select a reference point in an area where an emergency landing can be made if necessary
- Generally, enter on downwind
- Fly almost directly over the reference point
- Approaching the reference point:
- Abeam the reference point:
- Reduce the throttle to idle
- Roll into a steep bank (not to exceed 60°)
- Maintain a constant radius
- Adjust pitch to maintain best glide speed
- As the wind direction changes in the spiral, adjust bank angle to maintain a constant radius around the reference point
- Clear the engine on the upwind legs every turn
- Operating the engine at idle speed for prolonged periods may result in excessive engine cooling or spark plug fouling
- Check engine operation during the glide by "clearing" the engine on every upwind (to minimize any variation in ground-speed and turn radius)
- Conduct a series of at least three 360° turns
- Complete the maneuver on entry heading and set cruise power
- Recover above 1500' AGL unless combining the maneuver with an Emergency Approach and Landing
- Common errors
- Failure to adequately clear the area
- Excessive pitch change during entry or recovery
- Attempts to start recovery prematurely
- Failure to stop the turn on a precise heading
- Inadequate power management and airspeed control
- Attempting to perform the maneuver by instrument reference rather than visual reference
- Poor coordination, resulting in skidding and/or slipping
- Failure to coordinate the controls, so that no increase/decrease in speed results when straight glide is resumed
- Failure to scan for other traffic
- Failure to maintain orientation
Slow flight, stalls, and spins
- Slow flight
- What ?
- Anytime an aircraft is flying near the stalling speed or the region of reversed command, such as in final approach for a normal landing, the initial part of a go around, or maneuvering in slow flight, it is operating in what is called slow-speed flight
- Why?
- Develops the ability to recognize changes in aircraft flight characteristics and control effectiveness at critically slow airspeeds
- How?
- Clearing turn
- Pre maneuver checklist
- Pull throttle to 15
- Flaps 10º, 20º 30º
- Trim aircraft for airspeed
- Add throttle as necessary to maintain altitude
- Recover with full throttle and gradually decreasing flaps
- Common errors
- Failure to adequately clear the area
- Inadequate back-elevator pressure as power is reduced, resulting in altitude loss
- Excessive back-elevator pressure as power is reduced, resulting in a climb, followed by a rapid reduction in airspeed and "mushing"
- Inadequate compensation for adverse yaw during turns
- Fixation on the airspeed indicator
- Inadequate power management
- Inability to adequately divide attention between airplane control and orientation
- Stalls
- A stall is an aerodynamic condition which occurs when smooth airflow over the airplane’s wings is disrupted, resulting in loss of lift.
- A stall occurs when the critical AOA is reached
- It is possible to exceed the critical AOA at any airspeed, at any attitude, and at any power setting.
- Power on stall
- Why?
- To simulate a stall on takeoff, go around, climb, or when trying to clear an obstacle
- How?
- Select an altitude where recovery will occur no lower than 1500' AGL
- Clearing turn
- Pre maneuver checklist
- Decrease speed to rotation speed
- Full throttle and pitch up until stall
- Recover by pitching forward
- Power off stall
- Why?
- To simulate a stall during landing
- How?
- Select an altitude where recovery will occur no lower than 1500' AGL
- Clearing turn
- Pre maneuver checklist
- Pull throttle to 1500
- Flaps 10º, 20º, 30º
- Airspeed 60
- Pitch up until stall
- Recovery
- Pitch down and add rudder as necessary
- Increase power and gradually raise flaps
- Accelerated stall
- Why
- The objectives of demonstrating an accelerated stall are to determine the stall characteristics of the airplane, experience stalls at speeds greater than the +1G stall speed, and develop the ability to instinctively recover at the onset of such stalls.
- Stalls encountered any time the G-load exceeds +1G are called“accelerated maneuver stalls
- How
- Select an altitude where recovery will occur no lower than 1500' AGL
- Clearing turn
- Slow down to maneuvering speed (Va)
- Enter a level 45º turn
- Apply back pressure on the elevator until stall
- Recover with forward pressure
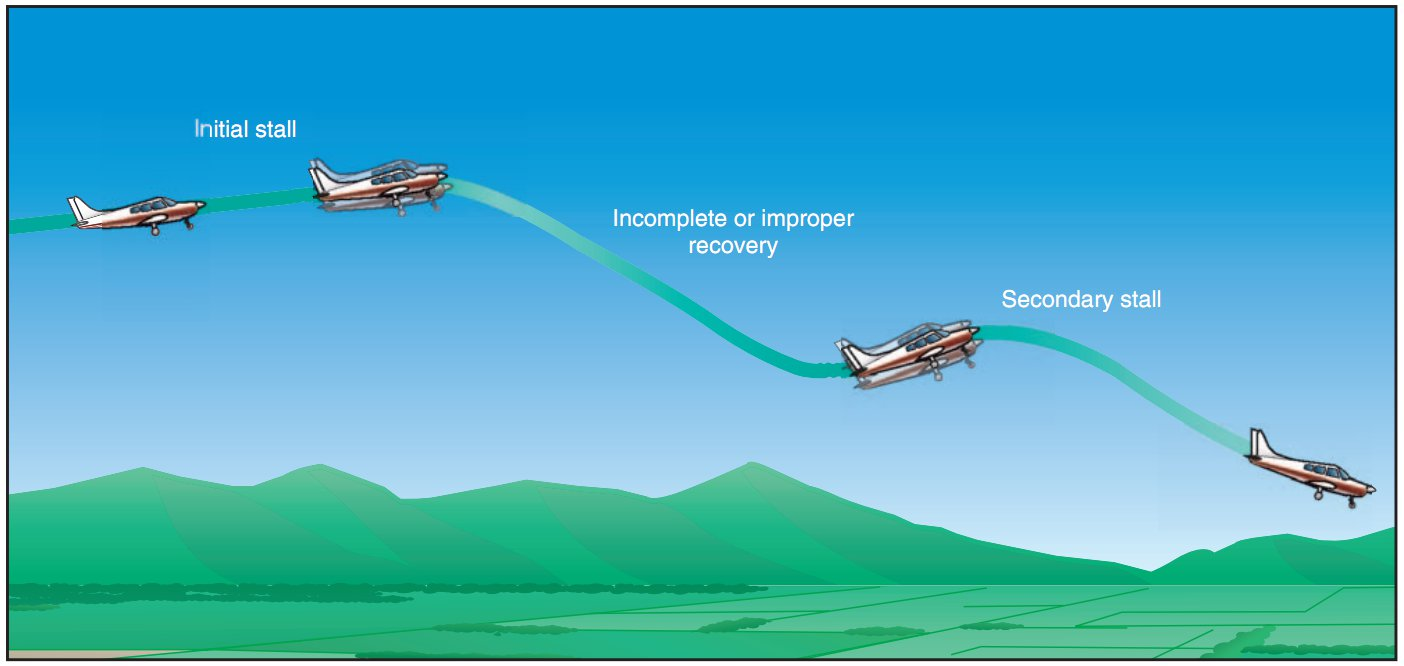
- Secondary Stall
- Why?
- Occurs after recovery from a preceding stall.
- Typically caused by abrupt control inputs or attempting to return to the desired flightpath too quickly and the critical AOA is exceeded a second time.
- It can also occur when the pilot does not sufficiently reduce the AOA by lowering the pitch attitude or attempts to break the stall by using power only
- How
- Recovery
- Reduce the angle of attack to regain control effectiveness
- Add full power to regain airspeed
- Maintain coordinated use of the ailerons and rudder to level the wings and prevent entering into a spin
- Immediately increase the pitch attitude to induce another (secondary) stall
- At the stall, callout, "stalling," reduce the angle of attack to regain control effectiveness
- Add full power to regain airspeed
- Maintain coordinated use of the ailerons and rudder to level the wings and prevent entering into a spin
- Adjust pitch to the Vx attitude, re-trimming as necessary and minimizing altitude loss
- With a positive rate of climb established:
- As airspeed increases, raise the flaps in increments, to 10 °:
- Too abrupt of flap retraction will result in a dramatic loss of lift and possibly stall
- Complete cruise checklist, returning to the altitude, heading, and airspeed required
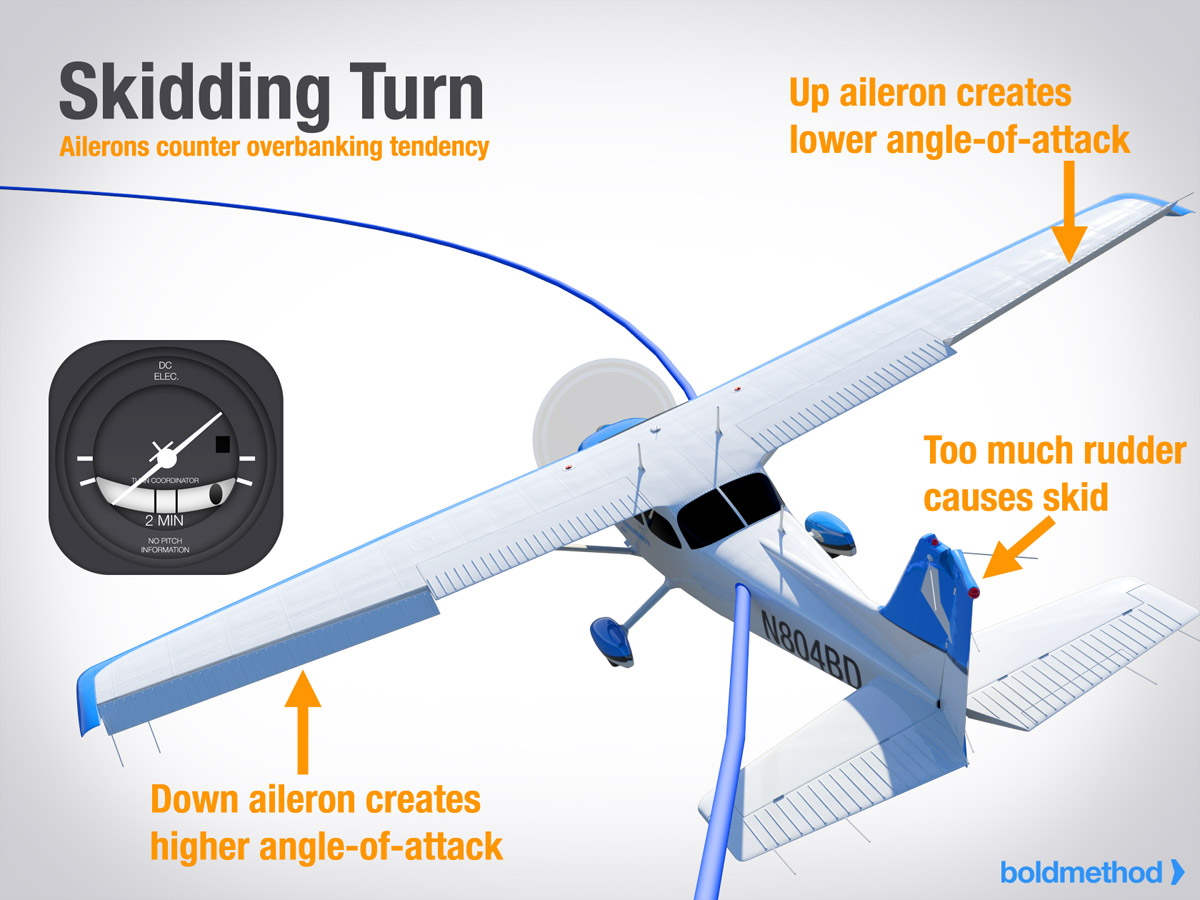
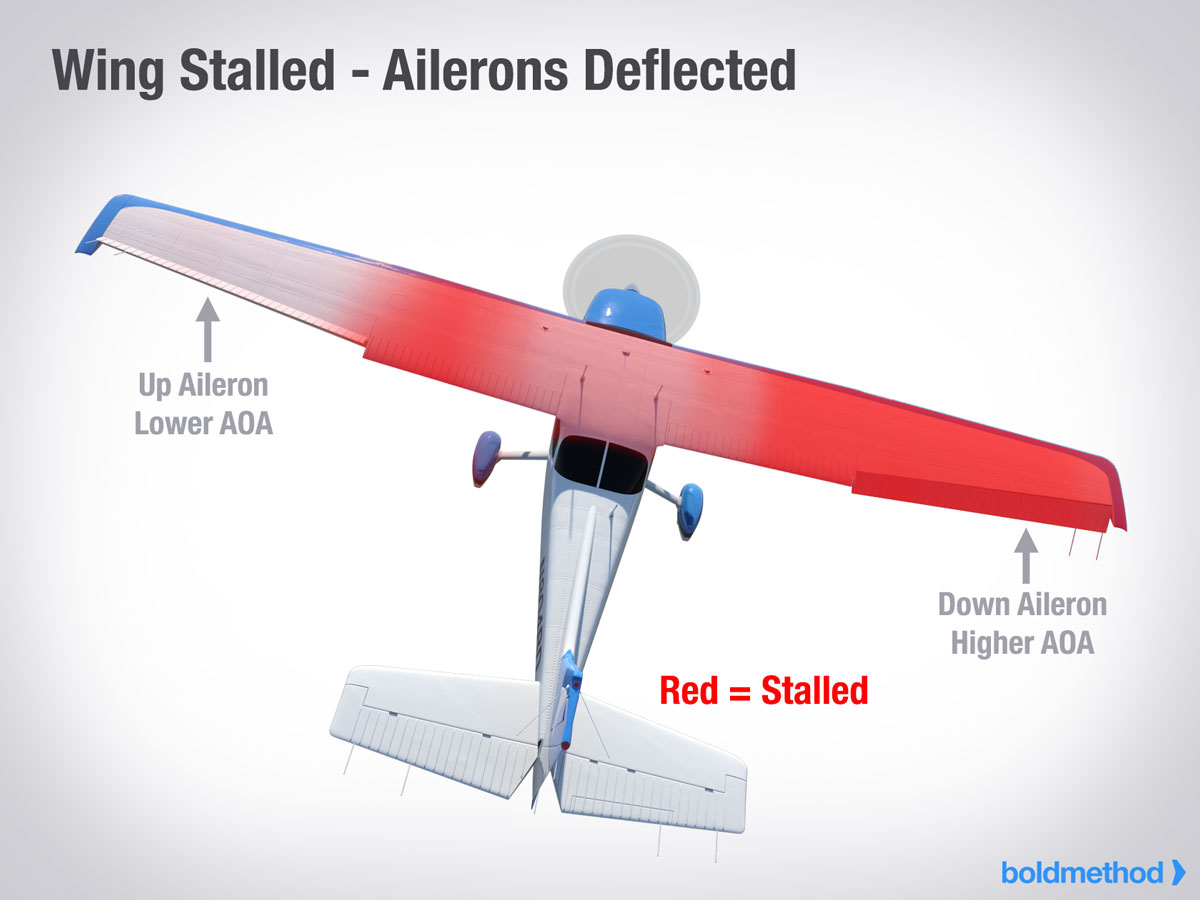
- Cross-Control Stall
- Why?
- Shows the effects of uncoordinated flight on stall behavior and to emphasize the importance of maintaining coordinated flight while making turns.
- Occurs when the critical AOA is exceeded with aileron pressure applied in one direction and rudder pressure in the opposite direction, causing uncoordinated flight.
- How
- Clear the area
- Select an altitude where recovery will occur no lower than 1500' AGL
- Choose forced landing area
- Configure aircraft for final approach for landing,
- Power at 1500 rpm
- Flaps up (flaps down will lead to excessive loads)
- Carburetor heat on
- Select outside references
- Reduce power to idle
- Maintain altitude until a normal glide and trim to relieve control pressures
- Roll into a medium bank turn (20°-30°) once on simulated approach
- Apply heavy rudder pressure in the direction of the turn (skidding turn)
- Apply opposite aileron pressure to maintain the bank
- Increase back elevator pressure to keep the nose from lowering
- Increase all flight control pressures until airplane stalls
- Recovery
- Immediately release all control pressures and, if necessary, allow the roll to continue until airplane reaches upright and level flight
- Increase power to full to climb and recover
- Maintain ball centered
- Look for traffic
- Elevator Trim Stall
- Why ?
- Shows what can happen when the pilot applies full power for a go-around or a simulated forced-landing approach without maintaining positive control of the airplane.
- The demonstration is to show the importance of making smooth power applications, overcoming strong trim forces, maintaining positive control of the airplane to hold safe flight attitudes, and using proper and timely trim techniques.
- How?
- Clear the area
- Select an altitude where recovery will occur no lower than 1500' AGL
- Choose forced landing area
- Configure aircraft for final approach for landing: approach power, 1500 RPM), full flaps down, carburetor heat on
- Select outside references
- Reduce power to idle
- Maintain altitude until normal glide speed is reached (60 KIAS)
- Trim nose up (full up for best effect) to simulate landing approach to maintain final approach speed
- Apply full power to simulate a go-around
- The combined forces of power, engine torque, back elevator trim will make the nose pitch up sharply with a left-turning tendency; as the pitch attitude increases to a point well above normal climb attitude, the potential for a stall exists

- Recovery
- Immediately apply positive forward elevator pressure to lower nose and return to normal climbing attitude
- Trim to relieve excessive control pressure
- Continue normal go-around procedures and level off at the desired altitude
- Maintain ball centered
- Look for traffic
- Spins
- Exhibits instructional knowledge of the elements of spins by describing:
- a. Anxiety factors associated with spin instruction.
- Fear of spins is deeply rooted in the public’s mind and many pilots have an aversion to them
- Learning the cause and proper procedure to prevent/recover will remove some of the anxiety ( Increases spin awareness as well as confidence)
- b. Aerodynamics of spins.
- Requirements for a Spin
- The airplane must be in a stall
- The airplane must be in uncoordinated flight
- Often one wing will drop at the beginning of a stall causing the nose to yaw to the low wing
- This is where rudder is important during a stall - Maintaining directional control to avert a spin
- If the airplane is allowed to yaw, one wing will drop in the direction of the yaw (the other will rise)
- Lowered Wing
- Unless rudder is used to correct the yaw, the airplane will begin to slip to the lowered wing
- The airplane also continues to roll toward the lowered wing
- The lowered wing has an increasingly greater AOA due to the upward motion of the relative wind
- It is then well beyond the critical AOA and suffers an extreme loss of lift and increase in drag
- Raised Wing
- The rising wing has a smaller/decreasing AOA
- The rising wing is less stalled and develops some lift causing the airplane to continue rolling
- c. Airplanes approved for the spin maneuver based on airworthiness category and type certificate.
- To determine if spins are approved check:
- Type Certificate and Data Sheets
- AFM/POH – Limitations section
- Placard in the airplane stating, “No acrobatic maneuvers including spins approved”
- Also Check:
- Weight and Balance limitations
- Recommended entry and recovery procedures
- d. Relationship of various factors such as configuration, weight, center of gravity, and control coordination to spins.
- Configuration
- Flaps - will generally increase the lifting ability of the wings and therefore decrease stall speed
- Weight
- An increased weight increases the stall speed since it requires a higher AOA to produce the lift necessary to support the additional weight
- The critical AOA will be exceeded at a higher airspeed
- Center of Gravity (CG)
- Minor weight or balance changes can alter spin characteristics
- The changes may allow operation within the CG but could affect recovery characteristics
- As the CG moves Aft – the airplane flies at a lower AOA (reducing back pressure and drag)
- This lowers the stall speed – The critical AOA will be exceeded at a lower airspeed
- This decreases stability
- An extremely aft CG makes spin recovery hard as the airplane loses its tendency to pitch down
- The shorter the arm from the elevator to the CG, the less force the elevator is able to produce making recovery more difficult
- An extremely aft CG may result in a flat spin and recovery may be impossible
- A forward CG - the airplane flies at a higher AOA and will stall at a higher airspeed (increased lift and drag)
- But, recovery will be easier as the nose will want to pitch down
- There also is a longer arm from the CG to the elevator which produces more force making recovery from stalls easier
- Control Coordination
- Uncoordinated flight is what results in a spin
- e. Flight situations where unintentional spins may occur.
- Stall + Yaw = Spin
- The primary cause is stalling the airplane while executing an uncoordinated turn
- Spins can occur while practicing stalls with uncoordinated controls or aileron deflection at critical AOA
- Critical phases of flight include Takeoff/Departure, Approach/Landing, and Engine Failure
- f. How to recognize and recover from imminent, unintentional spins.
- Continued stall (and spin) recovery practice
- A spin is dependent on yawing during a stall – Don’t let the airplane yaw during a stall
- g. Entry procedure and minimum entry altitude for intentional spins.
- Preflight
- Special emphasis on excess/loose items that may affect weight, CG, controllability of the airplane
- Pre-Maneuver
- Checklist
- Mixture RICH
- Carb. heat
- Lights ON
- Gauges GREEN
- Clear the Area - Above and Below
- Altitude - Above 3,500’ AGL so recovery can be completed at or above 1,500’ AGL
- Approximately 500’ is lost per 3 second turn
- Entry Phase
- Where the pilot provides the necessary elements for the spin (accidentally or intentionally)
- Similar to a power off stall Reduce power to idle while simultaneously raising the nose to a stalling pitch attitude
- As the stall approaches, smoothly apply full rudder in the direction of desired spin while applying full (to the limit) back elevator pressure
- Keep ailerons neutral
- Reduce power to idle on spin entry
- h. Control procedure to maintain a stabilized spin.
- Maintain full back pressure, to keep wings stalled
- Maintain full rudder in the direction of the turn, to keep yawing
- Maintain neutral ailerons
- i. Orientation during a spin.
- Select an outside reference point and use the turn coordinator
- Gyroscopic Instruments may tumble and be misleading (heading indicator, attitude indicator)
- The turn coordinator can provide the best reference as to the direction of the spin
- j. Recovery procedure and minimum recovery altitude for intentional spins.
- Occurs when the AOA of the wings decrease below the critical AOA and autorotation slows. Then, the nose steepens and rotation stops
- Step 1 – POWER IDLE Power aggravates the spin characteristics, resulting in a flatter spin and increased rotation
- Step 2 – AILERONS NEUTRAL Ailerons may have an adverse effect on recovery
- Ailerons in the direction of the spin may speed the rotation, delaying recovery
- Ailerons opposite the spin may cause the down aileron to force a deeper stall
- Step 3 – RUDDER OPPOSITE THE ROTATION
- Step 4 - ELEVATOR FORWARD To break the stall apply a positive/brisk, straight forward movement of the elevator
- Immediately after full rudder application and hold firmly in this position
- This will decrease the AOA and break the stall
- Step 5 – RUDDER NEUTRAL
- If not neutral the increased airspeed will cause a yawing or skidding effect
- Also, if the stall is not broken and full rudder is held in the opposite direction a spin can quickly start again in the new direction
- Step 6 – ELEVATOR BACK PRESSURE
- Once broken, raise the nose to level flight - Be careful of a secondary stall and exceeding load limits
- 2. Exhibits instructional knowledge of common errors related to spins by describing:
- a. Failure to establish proper configuration prior to spin entry.
- b. Failure to achieve and maintain a full stall during spin entry.
- c. Failure to close throttle when a spin entry is achieved.
- d. Failure to recognize the indications of an imminent, unintentional spin.
- e. Improper use of flight controls during spin entry, rotation, or recovery.
- f. Disorientation during a spin.
- g. Failure to distinguish between a high-speed spiral and a spin.
- h. Excessive speed or accelerated stall during recovery.
- i. Failure to recover with minimum loss of altitude.
- k. Hazards of attempting to spin an airplane not approved for spins.
- Why?
- Practicing spins build awareness regarding the recognition of, entry into, and recovery from spins
- A spin is an aggravated stall that results in what is termed “autorotation,” wherein the airplane follows a downward corkscrew path.
- How?
- Select a safe location
- Spins will result in large losses of altitude and so they should be performed free from high traffic areas
- Always broadcast your intentions over the appropriate deconfliction frequencies, if available
- Select a safe altitude
- Generally this should be no lower than 6000' AGL
- The intent is to have enough altitude to enter the spin, stabilize, and recover with plenty of safety margin
- Perform clearing turns
- You are going to lose a lot of altitude so be sure to check below you in addition to around you
- Reduce power , adjusting pitch (trimming) to maintain altitude
- The use of power at the entry will assure more consistent and positive entries to the spin
- At the first indication of stall (entry phase):
- Smoothly pull the elevator control to the full aft position
- Just prior to reaching the stall "break," apply rudder in the desired direction of spin rotation so that full rudder deflection is achieved almost simultaneously with reaching full aft elevator
- As the spin is entered (incipient phase), reduce the throttle to the idle position and ensure that the ailerons are in the neutral position
- Hold the elevator and rudder controls in full until the spin recovery is initiated (developed phase)
- Verify that the throttle is in the idle position to avoid over-speeding the aircraft
- Apply and HOLD full rudder opposite to the direction of the rotation
- Just after the rudder reaches the stop, move the control wheel briskly forward, far enough to break the stall
- HOLD these flight control inputs until the rotation stops
- As the rotation stops, neutralize the rudder
- You want to stabilize the aircraft's directional control
- Holding the rudder after the rotation stops could induce a spin in the opposite direction
- Roll wings level
- Level wins ensures you are not climbing in a turn
- Climbing in a turn decreases vertical lift, and causes unnecessary load factors
- Pull the nose up to the horizon
- Be careful not to stall the aircraft by being too aggressive but realize that you'll be in a very nose low altitude losing thousands of feet per minute
- Add power
- You'll need to add power to accelerate to cruise speed
- Apply power as necessary to avoid stalling but absolutely apply full power once level
- Emergency descent/landing
- Clear the area
- Choose forced landing area: choose a field and stick with it; best choice may be behind you
- Configure aircraft:
- No flaps
- Carburetor heat on
- Throttle to idle
- Establish and maintain best glide speed
- Engine out checklist:
- Carburetor heat on
- Fuel shut off valve on
- Mixture rich
- Primer in and locked
- Simulated: squawk 7700, mayday on 121.5
- Clear engine using brief applications of power
- Forced landing checklist (simulated):
- Mixture cutoff
- Fuel valve off
- Ignition off
- Unlatch doors
- Master off when landing assured
- Maneuver as necessary to reach key point on base
- Flaps and slip as necessary to reach aiming point
- Maintain ball centered
- Look for traffic
- Emergency procedures
- Power off 180
- What ?
- An approach and landing made by gliding with the engine idling through a 180o pattern, begun abeam a specified touchdown point on the runway, to a touchdown at or within 200’ beyond that point.
- Why?
- It instills judgment and procedures necessary for accurately flying the plane, without power, to a safe landing.
- How?
- Constant checking and adjusting the airplane’s glide path
- Clear the area
- Configure aircraft: landing checklist approx. 1000 AGL downwind for landing
- Throttle to idle abeam touchdown
- Establish and maintain best glide speed
- Select aim point ahead of touchdown point (compensate for ground effect)
- Position and adjust base leg as necessary and compensate for wind
- Flaps or forward slip as necessary for landing on touchdown point
- Land at touchdown point beyond and within 200’
- How to measure? Runway edge lights are spaced 50’
- Centerline + gap = 200’
- Common errors
- Downwind leg too far from runway/landing area
- Overextension of downwind leg resulting from tailwind
- Inadequate compensation for wind drift on base leg
- Skidding turns in an effort to increase gliding distance
- Attempting to stretch the glide during undershoot
- Premature flap extension
- Use of throttle to increase the glide instead of merely clearing the engine
- Forcing the airplane onto the runway to avoid overshooting the touchdown

Ground reference maneuvers
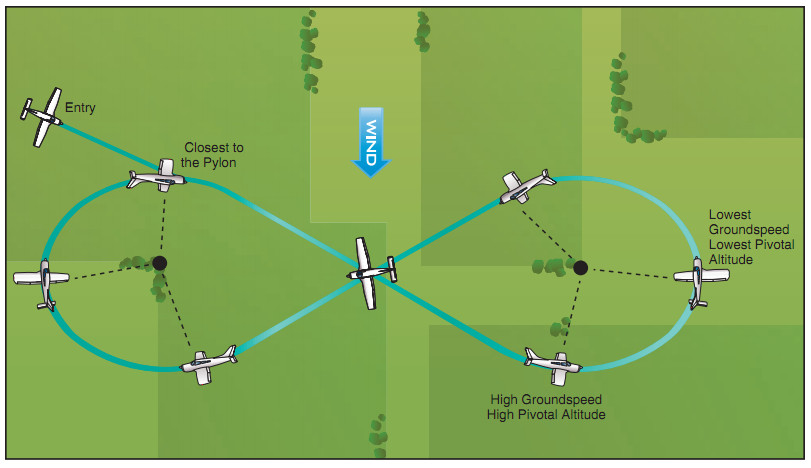
- 8’s on pylon
- What?
- Consists of a figure eight pattern at a pivotal altitude as two points, or pylons are used as references for turns
- Why?
- Develops the ability to maneuver the airplane accurately, while dividing your attention between the flight path and the selected points on the ground
- How?
- Clearing turn
- Pre maneuver checklist
- Groundspeed²/11.3 = pivotal altitude
- Choose pylon, a road with intersections usually works best
- Enter on 45º downwind, and wait until the first pylon is under your wing to bank
- Control distance with pitch, Elevators are the primary control for holding the pylons
- If the pylon moves ahead of your wing, pitch down. If it moves behind, pitch up
- Level out on a 45º, Count to 5, bank and choose next pylon
- Turns around a point - https://www.boldmethod.com/cfi-tools/turns-around-a-point/
- Why?
- Ground reference maneuvers develop basic pilot skills, using the ground to gauge deviations
- To begin, pilots must understand wind drift
- With the effects of winds understood, pilots can practice correcting for it
- These training exercises ultimately prepare a pilot for the rectangular course which trains the pilot for the next phase of training, the traffic pattern
- How?
- Clear the area.
- Power set to cruise.
- Select an altitude of 600-1000 AGL and pick a reference point.
- Determine wind direction: smoke, flags, shiny shore of water, ATIS
- Enter on a downwind to one side of the selected point at a distance equal to the desired radius of the turn
- Directly downwind and abeam the reference point, roll into the steepest bank to initiate maintaining a constant radius
- This will be your highest ground speed
- Turn not to exceed 45°
- As the turn continues, begin to shallow the bank, as necessary, to continue maintaining a constant radius
- Ground speed will decrease
- Directly upwind the bank should be at its shallowest
- Ground speed will be slowest
- As the turn continues, begin to steepen the bank, as necessary, to continue maintaining a constant radius
- Ground speed will begin to increase
- Continue the maneuver for another set of turns or depart on entry heading, as directed
- Upon completion of the maneuver, resume normal cruise, RPM

- Common errors
- Area not cleared first
- No emergency landing area in glide distance
- Aircraft not set up for cruise
- Erratic altitude
- Poor planning, orientation, or division of attention
- Uncoordinated
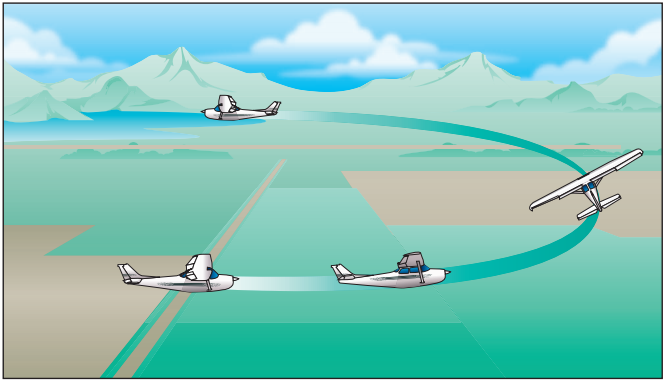
- S turns
- Why?
- S-Turns develop the ability to compensate for drift during turns by flying semi-circles of equal radius on each side of a reference line on the ground.
- How?
- Determine wind direction
- This is important for the entry heading and reference line
- Perform clearing turns looking for traffic and ground obstructions
- Select a reference line perpendicular to the direction of the wind
- Select an area where an emergency landing can be made if necessary
- May be performed on any straight line such as a road, fence, or railroad
- Select the point on upwind and turn back for a downwind entry
- Establish and maintain a cruise airspeed to enter the maneuver between 600-1,000' AGL
- Enter on a downwind to one side of the selected point, at a distance equal to the desired radius of the turn
- When abeam (perpendicular) or over the reference line (highest ground speed), begin the turn to roll into the upwind
- Apply adequate wind-drift correction to track a constant radius turn on each side of the selected reference line
- Start with a steep bank, as ground speed is highest
- Transition to a moderate angle of bank around 90° as ground speed begins to slow
- Shallow rolling out around 180° as ground speed is lowest
- Roll wings level at 180° so as to be straight and level directly over and perpendicular to the reference line
- When abeam (perpendicular) or over the reference line (lowest ground speed), begin the turn to roll back into the downwind
- Start with a shallow bank, as ground speed is lowest
- Transition to a moderate angle of bank around 90° as ground speed begins to rise
- Steepen the bank angle to roll out around 180° as ground speed is highest
- Roll wings level at 180° so as to be straight and level directly over and perpendicular to the reference line
- Depart on entry heading and resume normal cruise

- Common errors
- Failure to adequately clear the area
- Poor coordination
- Gaining or losing altitude
- Misjudging the rate of turn
- Faulty correction for drift
- Inadequate visual lookout for other aircraft
- Inability to divide attention between airplane control and maintaining ground track
- Rolling into an angle of bank too quickly will not result in crossing perpendicular to the reference line. (and the opposite)
- Rectangular course
- Why?
- The rectangular course maneuver simulates the airport traffic pattern
- How?
- Note wind direction and strength, if able
- Important for finding the downwind and anticipating ground speed
- Perform clearing turns looking for traffic and ground obstructions
- Pick a reference rectangle in an area where an emergency landing can be made if necessary
- Fields or perpendicular roads are best as they provide reference lines
- Distances should be about 1 mile in length and maintained at the same distance throughout the maneuver
- Establish and maintain downwind speed and 1,000' AGL throughout the maneuver
- Enter the maneuver on a 45° mid-field downwind
- Ground speed will increase as you enter the pattern
- Turn base at boundary:
- Steep bank, not to exceed 45°, transitioning to medium bank as the turn progresses
- Turn greater than 90°, to compensate for wind, so as you roll out you have established a crab
- GS: Decrease, due to lost tailwind
- Turn upwind at boundary:
- Medium bank, transitioning shallow as the turn progresses
- Turn less than 90°, due to the crab already set prior to your turn
- GS: Decrease, you are now flying directly into the wind
- Turn crosswind at boundary:
- Shallow bank, transitioning to medium as the turn progresses
- Turn less than 90° to allow for wind correction
- GS: Increase, due to the loss of the complete headwind component
- Turn downwind at boundary:
- Medium bank, transitioning to a much steeper bank than earlier, not to exceed 45°
- GS: Increase, due to the increasing tailwind
- Depart the maneuver on a 45° mid-field downwind
- Upon completion of the maneuver, resume normal cruise speed

- Common errors
- Failure to adequately clear the area
- Failure to establish proper altitude prior to entry (typically entering the maneuver while descending)
- Failure to establish appropriate wind correction angle, resulting in drift
- Gaining or losing altitude
- Poor coordination (Typically skidding in turns from a downwind heading and slipping in turns from an upwind heading)
- Abrupt control usage
- Inadequate visual lookout for other aircraft
- Standards
No comments:
Post a Comment